Header

Header

Wednesday, October 22, 2014

Halloween Series | Day 3- Burlesque Inspired Makeup

Day 3 in my Halloween Series was inspired by the movie Burlesque. If you've seen it, you know how those girls rock some killer makeup. Here is my version :)

First, apply your foundation as normal. I used a slightly lighter shade than my skin tone. 

Next, conceal and highlight the area you want more coverage. 
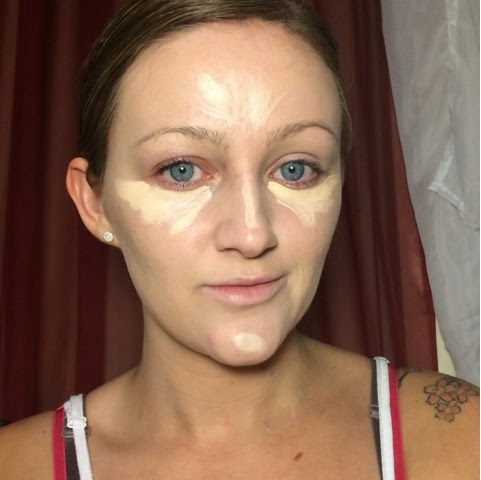
Powder to set everything. 

Contour your face, especially your cheekbones. Those girls had some seriously carved out cheek bones. 

Apply blush, focusing more on the apples of your cheeks. I went pretty heavy handed on the blush. Remember, it's stage makeup so it needed to be more noticeable under all of the stage lights. 

Then, highlight your cheeks. I used a cream product for a more intense glow. 

Fill in your brows and set with a brow gel. I went for a more natural brow since that's how the girls had theirs in the movie. 

Moving on to eyes, sweep a warm brown right about the crease for a transition shade and blend. 

Blend a sparky black into the crease, going a little heavy and winging the shadow out slightly. 

Now, pack a sparkly pink shade into the lid. I used MAC Rose pigment.  

Highlight the brow bone and inner corner with a white shimmer shade, and sweep the same black under the lower lashes. 

With a liner pen, draw on a fairly thick wing. 

Apply a matte red lipstick, really focusing on the Cupid's bow. 

Finally, apply some false upper and lower lashes and that's it!


This look is super simple and anyone with any level of skill can do it, so it's perfect for a quick Halloween look. Just pair it with a fun flapper outfit a la Chicago and you're good to go!

Did you guys enjoy this pictorial? Let me know in the comments!

What will you be dressing up as for Halloween? If you recreate any of my Halloween series looks, be sure to tag me on Instagram and Twitter #livforlashes

Have a good night everyone!

xoxo
LivforLashes

Follow me on Twitter! @LivforLashes

IG @livforlashes come check out my page, follow and like!

Email: liv_2008@icloud.com


Tuesday, October 21, 2014

Halloween Series | Day 2- Drag Makeup

Welcome to Day 2 in my Halloween Series! Day 2 is a Drag Look. Now this is in no way a representation of how actual drag queens look or do their makeup because let's face it, those guys put a lot of us to shame with their skills. This is just a cool idea that's been gaining some popularity the last few years- girls dressing up as guys who dress up as girls- and I thought it would be fun to try it for myself. 

So let's start!
 
First, start by gluing your eyebrows down. I used a glue stick, and yes I know there are more sophisticated products meant for this, but with a kindergartener in the house, I have an abundance of these laying around. 

Now for foundation. I used a full coverage foundation, Kat Von D Lock It Tattoo foundation. It sets pretty quick and can be hard to blend, but this gives me the best coverage for flawless skin. 

Use concealer to cover any undereye circles and also to highlight a little. Blend out with a beauty blender... Hopefully one that said kindergartener didn't attack with permanent marker. Once you have done that, set your face with powder. 

Now for brows. Drag queens tend to go over the top and exaggerated with their brows so I aimed for a high, curved arch. Start with the outline and fill in. 

Moving on to eyes, apply your crease color where your new crease should be. I chose a dark shimmery purple. 

Highlight the brow with a shimmery white and blend with the purple. 

Now for the lid, I used a soft pink. I then applied the same white to the tear duct area, also a little exaggerated. All of the eyeshadows that I used were from my BH Cosmetics Wild Child palette.


Grab some gel liner and make a big wing. Line the lower lash line, a little below the actual lashes and connect with the wing. 


Contour your face, more heavily than usual, and apply some blush. 

Line your lips, exaggerating your lip shape and apply some lipstick. I used a bright pink, with a lighter pink in the center for dimension. 


Finally, apply some wild lashes and your done, darling! I found these top and bottom lashes at walmart in the Halloween section. 


This look was SOOO fun the create! I could definitely see myself doing something like this for a Halloween party!
Did you guys enjoy this pictorial? Let me know in the comments!

What will you be dressing up as for Halloween? If you recreate any of my Halloween series looks, be sure to tag me on Instagram and Twitter #livforlashes so I can check them out!

Have a good night everyone!

xoxo
LivforLashes

Follow me on Twitter! @LivforLashes

IG @livforlashes come check out my page, follow and like!

Email: liv_2008@icloud.com