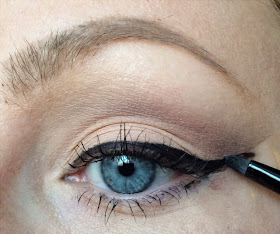
Happy Tuesday! So last night the hubby and I were going to see a friend perform at a bar with his band. I knew I wanted to do something kind of dark and smokey but I didn't really have a clear idea in my head. This is what I came up with.
I think it turned out pretty nice and I got a few compliments on it so I figured I'd do a pictorial for you guys.
Keep reading to see how I did this :)
So predictable, but first prime your eyes. This time around I used my Benefit Stay! Don't Stray! concealer primer. This isn't technically an eyeshadow primer, but it masks the pigmentation of my eyelids and really helps shadow stick. P.s... Excuse the mascara, I already had some makeup on from earlier in the day.
First I took "Truth" from my Vice 3 palette and ran that over the entire lid for my base color.
Next I took "DTF" and buffed that into the upper crease for my transition shade. This will help my other shadows blend a little smoother later on.
For the next part, I took a piece of scotch tape, and after removing some of the tackiness, I placed it from my lower lash line up towards the tail of my brows. This will give me a clean, sharp line for my liner and the other shadows I want to use.
Now I used my gel liner and drew in a wing, using the tape as a guide.
Going back to the crease, I mixed "Alchemy" and "Sonic" and blended that into the crease. I didn't bring it towards the inner part of the crease though. I focused on the outer two thirds or so and whatever was left on the brush was used in the inner portion.
I wasn't quite pleased with this so far, so I decided to smoke out the outer part of the wing by blending in "Revolver" with a pencil brush. Make sure your gel liner is completely set before you do this, or it'll smudge and look patchy. I also used whatever was left on the brush to blend into the outer crease slightly.
Now remove the tape and fix any patches in the foundation from the tape. Usually I do foundation and concealer after my eyes when I'm going darker or dramatic but like I said before, I already had makeup on.
With any black pencil, line your water line. I didn't want super dark so I used this Victorias Secret pencil I had lying around.
Take "Alchemy" and "Sonic" again and blend that into the lower lash line, smudging the black a bit.
To smooth things out, I then took "Alien" and lightly buffed that into the lower lash line as well.
I wanted a bit of sparkle but I didn't want to use glitter, so I dabbed my finger in my Stila "Rose Quartz" Magnificent Metals shadow and patted that in the inner corner the tiniest bit.
To polish the look off, I applied some of my favorite falsies, these Abyssinian Mink lashes from Nubounsom (you guys know I love Nu). These were perfect since they're full and glamorous, but still very soft and fluffy.
And this is the finished look!
What do you guys think? It's smokey and a little more dramatic, but I think it has enough balance to it to not be overwhelming.
Well that does it for this post! I hope you liked it and I would love to see some of your recreations of this or any of the pictorials I've posted on here! Just tag #livforlashes on Twitter (trying to get more active on there...oops lol) and Instagram.
Thanks for reading guys and feel free to leave suggestions for my next makeup look below!
xoxo
LivforLashes
Follow me on Twitter! @LivforLashes
Find me on Instagram @livforlashes
Email: liv_2008@icloud.com


No comments:
Post a Comment