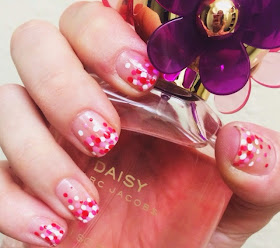
Happy Valentine's Day guys! Have you ever had a big date and gotten every little detail planned for a perfect night, only to realize last minute you didn't get your nails done? Don't fret! I have three super easy manicures for V-Day, whether you had just forgotten about your nails for your big date, or you're just a last minute person like I am. Each one is super simple and literally takes just a few moments and the best part? No tools! No complex designs! Literally any one with any type of nail painting skill level (if that's such a thing) can do these. The only "tools" you need are your polishes (obviously), a bobby pin, and a cosmetic sponge. Keep reading to see how to create these cute nails!
1. Dot Manicure
For this first one you need several polishes. I used white, light pink, dark pink and red. You will need a bobby pin for this one.
Start off with clean nails, painted with just a clear base coat. With your bobby pin, dip it in the white polish and start dotting the polish on to your nail. It doesn't have to be precise and there's no pattern here we're aiming for.
Repeat this with the other three nail polish colors, filling in the blank areas with different colors as you go.
Seal with a top coat and you're done! I concentrated my dots more towards the tip of the nail, but you can do the whole nail, or just an accent nail like this if you want.
2. Ombré Accent Manicure
For this one you need the same polishes as the first manicure and a disposable cosmetic sponge. Start by painting a nail or two with the white polish. This is our base for the ombré. I painted the other nails the same colors I am using for my ombré.
Now paint stripes of polish, going from dark to light on to the cosmetic sponge.
Dab the sponge on to the white base, allowing a few seconds between coats for the polish to set some. If you do it while it's too wet, the colors get mixed and messy.
Clean up the edges with a q-tip dipped in remover and add a top coat to finish off this mani.
3. Gold and Red Heart Manicure
For the third manicure I wanted something a little more sultry and not so bright as pink, so I went for gold and red. Paint one or two nails gold and the rest red.
For the gold nail(s), grab your trusty bobby pin and dip it into some red polish.
Dab two dots of polish on to the upper corner of the nail. This will be the top of our heart.
With a little more red polish, connect the dots to finish the heart.
Add a couple of red dots by the point of the heart.
On the red nails, I wanted something so they weren't so basic, so I pulled out some nail studs. You can get these anywhere for just a few bucks. I put a tiny dot of clear polish near the cuticle and then placed a gold circle stud right on the polish.
Again, seal everything with a coat or two of clear polish and you're done!
See? Super simple and each one literally took me about five minutes (not counting drying time between coats). These are perfect for a last minute mani and so cute too!
I hope you guys liked this post! Which one was your favorite?
xoxo
LivforLashes
Polishes Used:
China Glaze Clear Base/Top Coat
Follow me on Twitter! @LivforLashes
Find me on Instagram @livforlashes
Email: liv_2008@icloud.com


These are so beautiful! I'll have to try them sometime. x
ReplyDeletewww.lineupthemakeup.blogspot.com
These nail designs are so pretty and you make it look so easy! Leave it to me to completely mess them up though lol
ReplyDeleteWww.beautyandablog.com
I didnt see these around vday, but i love the dot one!
ReplyDelete