Header

Header
Showing posts with label Information. Show all posts

Wednesday, December 2, 2015

Hooded Eyes | Tips and Tricks | Blogmas Day 2

If you have hooded eyes, you have probably figured out that some makeup looks just don't work on you. I myself have hooded eyes and it took a lot of trial and error to find makeup looks that not only flatter my eyes, but looks that do not accentuate my hooded lids or make my eyes look weighed down. I've compiled a little list of tips and tricks for hooded kids, so I hope you find these helpful. 

1. Brows
Eyebrows not only frame your face, but they can also open up the eyes. Shaping your brows with an arch can really give the appearance of a lifted lid, easing some of the heavy look of a hooded eyelid. Brows that are shaped without a prominent arch, or straight in the bottom can really make a hooded lid look even more hooded. 

2. Blending in the crease. 
With hooded lids, shadows that are blended directly into the crease can often times become hidden by the hood when your eyes are opened. Avoid this by blending your crease shades and transition shades right above the creased hood. Do this by blending while your eyes are open, so you can see exactly where you are placing the eyeshadow. 

3. Defining the crease
Adding a deeper shade to the crease can quickly look messy on hooded lids. Instead of blending your deeper shades directly into the crease, try swirling them on to the outer third of your eyelid and slightly above the outer crease. Blend in a rounded shape. This will help give the appearance of more rounded and wider eyes, instead of weighing the hooded kid down with dark eyeshadows. 

4. Shimmer on the lid
With hooded eyes, most eyeshadows placed in the lid transfer to the crease once you open your eyes. So if you want a little shimmer on your lid, try applying it to just the inner half of your lid or so, avoiding the bulk of the hood. With hooded lids, shimmer shadows that have bled to the hood can reflect light onto that hood, accentuating your hooded eyes making them appear smaller. 

5. Brow bone highlight
The same concept goes for highlighting the brow bone. A shimmery shadow applied to the brow brings attention to the hood, making it look heavy. Using a matte shade avoids this, thus not directing attention to the hood. 

6. Winged liner
Anyone with hooded eyelids who have tried winged liner may know how hard it is. You can have the most perfect line while your eye is closed but once you open it, the hood either cuts through your wing, or completely changes the shape of your liner. Help avoid this by drawing the outer half of your liner thicker, cutting directly into the hood and drawing your wing over it. It may look a little heavy while your eyes are closed, but it really helps give you a perfect wing once you open them. 

7. Waterline
Using a flesh tones or white eyeliner in the water line helps open the eyes up more, making them appear more awake and wider. With hooded eyes, this is especially helpful. When you use a black liner in the waterline, it closes off the eye making it appear smaller, so not you have a hood on top weighing down the upper lid, and black liner on the bottom closing off the bottom. 

8. Mascara and lashes
A good tip for hooded eyes is to use either a waterproof or long wearing mascara, like Benefit They're Real! Mascara. Throughout the day, the oils on your kids and the hood of your lid can cause the mascara to streak into the hood. For falsies, try to stick to styles that flair out on the ends. Even the daintiest lashes can overwhelm hooded eyes, effectively blocking any effort you put into your lid makeup, the a flared style helps give your makeup look a little glam with the lashes, but also still showcases the hard work you put into your makeup look. 


Hooded eyes are a pain, but with the right tips, you can really learn to work with them. While they'll probably frustrate me to no end, I've finally balky learned not to hate them and to embrace my hooded eyes. While I know I'll never be able to rock a perfect cut crease, or have that amazing graphic winged liner, I know that my eyes give me character. 

I hope you found these tips and tricks helpful! Rock your hooded lids and let me know some of your favorite tricks for hooded eyes!


xoxo
LivforLashes


Follow me on Twitter! @LivforLashes


Find me on Instagram @livforlashes


Email: liv_2008@icloud.com

Thursday, October 8, 2015

Affordable Dupes for High-End Favorites!


The Internet is full of dupe lists of our favorite makeup products, and thanks to Temptalia, you can find a dupe for almost anything. Well, I wanted to share a little list of some of my own personal favorite products and some affordable options as alternatives to their high end counterparts. 


Both of these foundations boast a full coverage and both are long wearing. The Revlon foundation is slightly less coverage with a not quite as matte finish, but for a fraction of the cost, it's super comparable to Doublewear. 


When the four powders in the L'oreal neutral highlighter are swirled together, it creates a glow almost exactly it like Lightscapade. It is slightly less fine milled, and takes a little more blending, but the outcome is identical. 


3. Essence Metallic Effect Eyeshadow in Sandy Says Hello ($2.99) vs. Stila Kitten single eyeshadow ($18)
Kitten is my all time favorite eyeshadow, so when I found SSH by Essence, I immediately snagged a few up. Kitten is slightly more glittery, and SSH slightly more beige, but on the lid and blended out, they both give a gorgeous champagne shimmer.


Both of these are great products for that light golden highlight. The Elf one is a little more powdery, but a little extra blending helps that. Plus these are both great dupes for NARS Albatross!


5. Revlon blush in Mauvelous ($8.49) vs. Kat Von D Everlasting Face Shaper Blush in Truth ($25)
These blushes are seriously identical on the skin. The KVD one is slightly creamier and more pigmented, but for a drugstore blush, this Revlon one is a good pick. 


Both of these lotions give your face a luminous glow underneath foundation. The L'oreal one feels slightly thicker with more of a silver glow while Strobe Cream is a little more pink, but these are pretty darn good matches for each other. 


These three are literally identical. They are all a slippery silicone base that helps fill pores and smooth out your foundation. They glide on smooth and dry fast too. The elf one feels slightly thicker, but I kind of prefer that. 


While the Elf duo is a lower quality than the NARS Powders, it's a great alternative for only a few bucks. The elf blush is a little chunkier with bigger shimmer particles, but with a few extra swipes of your brush, it gives that same peachy golden glow as Orgasm. Laguna is slightly lighter than the Elf bronzer, but again, once blended out, the bronzers are identical on the skin.


If you can't quite bring yourself to spend $20 on a makeup sponge, the Real Techniques sponge is an awesome alternative. I even prefer it to my Beauty Blenders. Both are a super dense but smooth sponge that applies foundation and blends concealer flawlessly. I like how the Real Techniques one has that flat side though, making it a little more versatile for using different products than the Beauty Blender. 


What are some of your favorite dupes? I would love to hear and find some newer alternatives to other products. I hope you found this post helpful and let me know if you enjoyed it! 


Follow me on Twitter! @LivforLashes


Find me on Instagram @livforlashes


Email: liv_2008@icloud.com


Monday, September 28, 2015

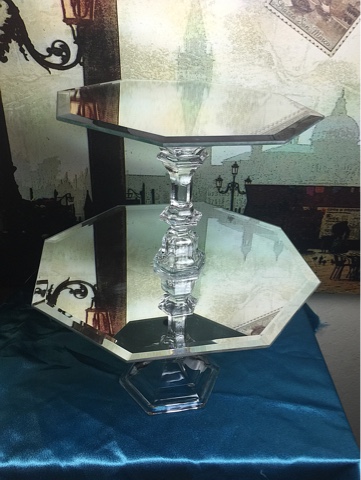
Pinterest DIY | Mirror Perfume Stand


I was browsing Pinterest the other night and came across something I'd seen a million times before: DIY cupcake/cosmetic stands. I've always thought they look pretty cool but never really thought about making one until now. It looked simple enough with minimal supplies needed so I decided to give it a go. After a quick trip to Hobby Lobby with supplies in hand I got to work.


What you'll need:
Mirrors (one for as many levels as you want your stand)
A ruler
E6000 glue (perfect for binding glass) 
Candle holders 
Lip liner 


1. Use your ruler to measure the backs of the mirrors to find the center and mark it with the lip liner. I chose to use a liner since it washes off. 


2. Do the same thing to measure the bases of the candle holders to mark where they would be centered on the back of the mirrors. REMEMBER: Mark the wider end of the candle holder to be glued to the back of the mirror for your bottom tier for better stability of your stand. Mark the smaller end to be glued to the backs of your other tiers. 


3. Apply a generous amount of the E6000 along the edge of the candle holder. This dries clear so don't worry too much about making a little mess with the glue. NOTE: this glue has a very strong smell so be sure to use it in a well ventilated area and avoid inhaling it. 


4. Press the candle holders carefully to the back of the mirrors, holding firm pressure for a minute or two. Now let each tier dry before trying to stack them. The glue takes a minimum of 24 hours to cure, so some patience is needed :)


5. With your cured tiers, mark the top side of the mirrors the same as steps 1 and 2. 


6. Again, apply the glue to the edge of the candle holder to adhere the tiers together. Be more careful with the glue this time to avoid smearing it on the mirrors. If you do make a mess, you can dissolve the glue (before it's cured) with some acetone on a q-tip or cotton ball. 


7. Allow it to cure completely before use. I let mine set for a good two days before setting up my perfumes. 


And voila! A cute perfume stand perfect for displaying your favorite scents! I can't believe how simple it was to make this and how cheap too! So easy and I think it turned out pretty well. The mirrors and crystal candle holders are so chic yet its understated and simple. 


What do you think? Is this something that you'd want to try? Let me know! And let me know if you enjoyed this post or if you'd like to see more DIY posts. Have an amazing day and thank you for reading!


xoxo
LivforLashes


Follow me on Twitter! @LivforLashes


Find me on Instagram @livforlashes


Email: liv_2008@icloud.com

Saturday, August 29, 2015

Makeup Fails! Products I Regret Buying


Every now and then we buy makeup with high hopes of it being awesome and it just doesn't live up to expectations. It happens to me all the time whether a color just doesn't suit me like I had hoped or the product itself just doesn't perform like expected. I've put together a little list of products that were total fails for me. Now this doesn't mean that they are totally bad for everyone, they just didn't work out for me personally. 


First up is this Covergirl blush. I can't even tell you the name since the sticker fell off but I fell in love looking at it in CVS. It looked like such a pretty peachy color with a hint of shimmer but unfortunately since we can't test drugstore makeup in the U.S. I had no idea that in reality it looks terrible on my skin. It is good for a light hint of color but once you build it up it almost has a blue metallic sheen. It gives a totally '80's vibe and I just don't dig it.
***
Next up is a high end product and it's the Urban Decay original Naked Flushed palette. I really liked this when I first got it but I never find myself reaching for it. Ever. The colors are ok, but I've just found better bronzers, better blushes and WAY better highlighters so this just sits in my drawer totally neglected. 
***


These break my heart but I have to add my Melt Cosmetics Shady Lady and Belladonna 2 lipsticks to the list. I really like the colors and I even found a way to work with the super dry formula, but after having these less than 6 months, they now have this weird iridescent green film on them, almost like mold. I contacted the company and showed them pics and all they did was give me a code for free shipping on my next order. It's a total bummer since for $19 a lipstick you expect a higher quality than this. I'm almost afraid to order replacements in case this happens again. I have had some MAC lipsticks for literally years and have never had this problem, so these are definitely a fail. 
***


When Maybelline announced the launch of The Nudes palette, everyone was so excited. I was too until I actually got the palette. It just sucks! There's no pigmentation at all and you really have to dig your brush in the pans for any kind of payoff. Plus the shadows are so patchy once you actually get them on your lid that this whole palette is just a disaster for me. 
***


I really used to love this Moisture Renew lipstick from Rimmel in the shade Lets Get Naked, but now I just can't handle it. It has such a strong perfume-y floral scent, that I get a headache within minutes of application. And the scent doesn't fade away like most lipsticks. It's such a pretty peachy nude shade and it's a shame that it smells so strong of someone's grandma.
 ***

This next item is pretty new and I was so excited to try it. The Covergirl Stay Luminous Natural Glow Foundation was boasted as a drugstore alternative to the NARS Luminous Weightless foundation but it just doesn't live up. It's a very dewy finish and even with powder doesn't feel like it sets at all. It just feels wet all day.  Throughout the day it just melted off of my face and I'm not even oily. Plus the color is almost ashy. I tried two different shades and it just left my face looking a little weird with a cast. 
***


Next is a mascara. I tend to stick to my tried and true formulas for mascara but I decided to give this L'oreal Voluminous Miss Manga mascara a try. It's a nice formula but I abhor the brush. It's supposed to flexible, but it's so flexible that I don't feel like it grabs on to my lashes at all. It just kind of bounces around hitting just the roots or just the ends of my lashes and I'm left with a clumpy mess. 
***


I knew the Hard Candy Glamoflauge concealer was heavy duty, so I knew kind of what to expect. At first I liked it for covering acne spots or redness around my nose, but it's just too greasy feeling for under the eyes. Once it's set it easily gets cakey and it's just too hard for me to make it work and still have it look nice. It creases like no other and after a bit of sitting in my drawers, the formula separated into an oily mess.
 ***

Last up is an eyeshadow palette from Coastal Scents. I ordered the 28 Neutral palette on a whim for like $10 so I wasn't expecting much. The shadows themselves are okay, but I just never find myself using it. When I remind myself to use it, I'm just never that impressed with the quality of the shadows. They're a little powdery, some shades blend away to nothing and I find them to all be a little patchy when applied. I still try to use it from time to time, but I just find myself disappointed again and again. 
***


So like I said, maybe these products didn't work for me, but maybe they are your holy grail products. It's all opinion, but I know I won't be wasting any more of my hard earned cash on these again. What about you? What are some products that were total fails for you? Let me know in the comments and have a fabulous day!

Follow me on Twitter! @LivforLashes

Find me on Instagram @livforlashes

Email: liv_2008@icloud.com