Header

Header
Showing posts with label How-To. Show all posts

Friday, December 11, 2015

Homemade Holiday Face Masks | Blogmas Day 11


My skin tends to go a little haywire in the winter months, so masks have become an essential part of my skincare routine. Face masks have an array of advantages, from brightening dull skin, exfoliating, soothing irritated skin amongst other benefits, and nothing is better than a mask made from fresh ingredients found right in your kitchen. Today I have 4 tried and true homemade face masks for you to try out this winter! And the best part is each one literally takes minutes to make.

1. Pumpkin Oatmeal Mask


2 tbsp. raw pumpkin
1 tbsp. rolled oats
1 tbsp. honey

Pumpkin is amazing for your skin. It contains vitamins A and D which can help to soften, soothe and brighten skin. Add in the astringent properties of honey and the exfoliating potential of the oatmeal and you have a good mask to help irritated dull skin when mixed together.

2. Ginger and Honey Mask
2 tbsp. Ginger Juice (throw ginger root and water in blender, strain)

1 tbsp. Honey

Ginger is awesome to treat acne scars because of the natural anti-inflammatory elements it contains. Mixed with the honey, and you have an excellent mask for acne clearing. Simply apply the mask, wait 20 minutes and gently wash off. *Fresh Ginger can also be used to dab on acne spots as a spot remover.

3. Cocoa Coffee Mask


1 tbsp. unsweetened cocoa
1 tbsp. ground coffee beans
1 1/2 tbsp. almond oil (or any carrier oil)

Coffee is known to reduce inflammation and redness and as an exfoliator, it gently removes dead skin and gives life to a dull complexion. Cocoa is a good source of antioxidants and it also contains sulfur, which is great for fighting acne. Simply mix together to make a paste, apply to face an after about 20 minutes gently wash off of your face.

4. Sweet Potato Ginger Mask

3 tbsp. mashed sweet potato (cooked)
2 tsp. grated fresh ginger
1 tbsp. honey
1 tbsp. milk/almond milk/ soy milk

Before you toss those sweet potatoes in your casserole, save a little for this mask! Sweet potatoes are known for their anti-inflammatory and anti-aging properties and mixed with the honey and ginger it becomes a mask that'll leave your skin seriously smooth and brighter. Just blend all ingredients until smooth, apply to face for about 30 minutes and gently scrub off.

I hope you find these facial mask ideas helpful! Let me know if you try any and what your thoughts are!

xoxo
LivforLashes

**images from Google**

Follow me on Twitter! @LivforLashes

Find me on Instagram @livforlashes

Wednesday, December 2, 2015

Hooded Eyes | Tips and Tricks | Blogmas Day 2

If you have hooded eyes, you have probably figured out that some makeup looks just don't work on you. I myself have hooded eyes and it took a lot of trial and error to find makeup looks that not only flatter my eyes, but looks that do not accentuate my hooded lids or make my eyes look weighed down. I've compiled a little list of tips and tricks for hooded kids, so I hope you find these helpful. 

1. Brows
Eyebrows not only frame your face, but they can also open up the eyes. Shaping your brows with an arch can really give the appearance of a lifted lid, easing some of the heavy look of a hooded eyelid. Brows that are shaped without a prominent arch, or straight in the bottom can really make a hooded lid look even more hooded. 

2. Blending in the crease. 
With hooded lids, shadows that are blended directly into the crease can often times become hidden by the hood when your eyes are opened. Avoid this by blending your crease shades and transition shades right above the creased hood. Do this by blending while your eyes are open, so you can see exactly where you are placing the eyeshadow. 

3. Defining the crease
Adding a deeper shade to the crease can quickly look messy on hooded lids. Instead of blending your deeper shades directly into the crease, try swirling them on to the outer third of your eyelid and slightly above the outer crease. Blend in a rounded shape. This will help give the appearance of more rounded and wider eyes, instead of weighing the hooded kid down with dark eyeshadows. 

4. Shimmer on the lid
With hooded eyes, most eyeshadows placed in the lid transfer to the crease once you open your eyes. So if you want a little shimmer on your lid, try applying it to just the inner half of your lid or so, avoiding the bulk of the hood. With hooded lids, shimmer shadows that have bled to the hood can reflect light onto that hood, accentuating your hooded eyes making them appear smaller. 

5. Brow bone highlight
The same concept goes for highlighting the brow bone. A shimmery shadow applied to the brow brings attention to the hood, making it look heavy. Using a matte shade avoids this, thus not directing attention to the hood. 

6. Winged liner
Anyone with hooded eyelids who have tried winged liner may know how hard it is. You can have the most perfect line while your eye is closed but once you open it, the hood either cuts through your wing, or completely changes the shape of your liner. Help avoid this by drawing the outer half of your liner thicker, cutting directly into the hood and drawing your wing over it. It may look a little heavy while your eyes are closed, but it really helps give you a perfect wing once you open them. 

7. Waterline
Using a flesh tones or white eyeliner in the water line helps open the eyes up more, making them appear more awake and wider. With hooded eyes, this is especially helpful. When you use a black liner in the waterline, it closes off the eye making it appear smaller, so not you have a hood on top weighing down the upper lid, and black liner on the bottom closing off the bottom. 

8. Mascara and lashes
A good tip for hooded eyes is to use either a waterproof or long wearing mascara, like Benefit They're Real! Mascara. Throughout the day, the oils on your kids and the hood of your lid can cause the mascara to streak into the hood. For falsies, try to stick to styles that flair out on the ends. Even the daintiest lashes can overwhelm hooded eyes, effectively blocking any effort you put into your lid makeup, the a flared style helps give your makeup look a little glam with the lashes, but also still showcases the hard work you put into your makeup look. 


Hooded eyes are a pain, but with the right tips, you can really learn to work with them. While they'll probably frustrate me to no end, I've finally balky learned not to hate them and to embrace my hooded eyes. While I know I'll never be able to rock a perfect cut crease, or have that amazing graphic winged liner, I know that my eyes give me character. 

I hope you found these tips and tricks helpful! Rock your hooded lids and let me know some of your favorite tricks for hooded eyes!


xoxo
LivforLashes


Follow me on Twitter! @LivforLashes


Find me on Instagram @livforlashes


Email: liv_2008@icloud.com

Monday, September 28, 2015

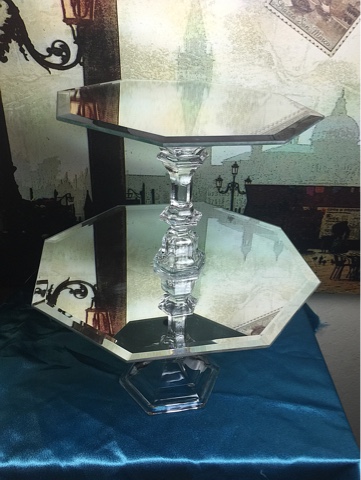
Pinterest DIY | Mirror Perfume Stand


I was browsing Pinterest the other night and came across something I'd seen a million times before: DIY cupcake/cosmetic stands. I've always thought they look pretty cool but never really thought about making one until now. It looked simple enough with minimal supplies needed so I decided to give it a go. After a quick trip to Hobby Lobby with supplies in hand I got to work.


What you'll need:
Mirrors (one for as many levels as you want your stand)
A ruler
E6000 glue (perfect for binding glass) 
Candle holders 
Lip liner 


1. Use your ruler to measure the backs of the mirrors to find the center and mark it with the lip liner. I chose to use a liner since it washes off. 


2. Do the same thing to measure the bases of the candle holders to mark where they would be centered on the back of the mirrors. REMEMBER: Mark the wider end of the candle holder to be glued to the back of the mirror for your bottom tier for better stability of your stand. Mark the smaller end to be glued to the backs of your other tiers. 


3. Apply a generous amount of the E6000 along the edge of the candle holder. This dries clear so don't worry too much about making a little mess with the glue. NOTE: this glue has a very strong smell so be sure to use it in a well ventilated area and avoid inhaling it. 


4. Press the candle holders carefully to the back of the mirrors, holding firm pressure for a minute or two. Now let each tier dry before trying to stack them. The glue takes a minimum of 24 hours to cure, so some patience is needed :)


5. With your cured tiers, mark the top side of the mirrors the same as steps 1 and 2. 


6. Again, apply the glue to the edge of the candle holder to adhere the tiers together. Be more careful with the glue this time to avoid smearing it on the mirrors. If you do make a mess, you can dissolve the glue (before it's cured) with some acetone on a q-tip or cotton ball. 


7. Allow it to cure completely before use. I let mine set for a good two days before setting up my perfumes. 


And voila! A cute perfume stand perfect for displaying your favorite scents! I can't believe how simple it was to make this and how cheap too! So easy and I think it turned out pretty well. The mirrors and crystal candle holders are so chic yet its understated and simple. 


What do you think? Is this something that you'd want to try? Let me know! And let me know if you enjoyed this post or if you'd like to see more DIY posts. Have an amazing day and thank you for reading!


xoxo
LivforLashes


Follow me on Twitter! @LivforLashes


Find me on Instagram @livforlashes


Email: liv_2008@icloud.com

Friday, June 5, 2015

Battle of the Contour Palettes!

These days you don't even have to be a makeup lover to know that contouring is EVERYWHERE. Almost every major makeup brand from drugstore to high end has come out with their own contouring kit or palette and it it can get a little overwhelming trying to find once that suits you. Well I decided that I'm going to do a little run down of a few of the popular palettes to maybe help you decide which would be a good fit for you. 

Anastasia Beverly Hills Contour Kit ($40)
First up is the Anastasia Beverly Hills Contour Kit. ABH was one of the first brands to really popularize contouring recently and this kit is crazy popular. 

Pros:
-magnetized pans 
-tons of shade selection to choose from
-easy to blend powder
-widely available at many stores and online
-six shades for a variety of contouring styles
-thin palette good for travel 
-fair price for the brand (roughly $6.67 per pan)
-options for matte/shimmer highlight shades

Cons:
-pans are small
-powders can be a bit powdery
-sells out fast and restocks can take a while
-packaging is somewhat bulky compared to size of pans
-no mirror inside of palette
-color fades throughout day
-no guide for product placement for beginners 

Too Faced Cocoa Contour ($40)
If you love the Chocolate Soleil bronzers from Too Faced, you'd love this one. It's has four shades and all are made with the same moisture and antioxidant rush Cocoa a complex in other TF products and has that same divine chocolate smell. I love this one. 

Pros:
-universal shades to use on many skin tones
-warmer shade to bronze
-cooler shade to sculpt
-shimmer highlight shade included
-mirror included in palette
-comes with mini slanted kabuki brush for easy application
-product placement guide included
-buttery texture makes it easy to blend

Cons:
-higher price for amount of product ($10 a pan)
-highlight shade is too glittery for some tastes
-packaging is quite bulky
-light highlight shade is slightly ashy
-can easily look muddy of not blended
-easy to pick up too much product on brush

Kat Von D Shade + Light Contour Palette ($46)
This is a fairly new one on the market and it's been making waves across YouTube and Instagram. It's a best seller and it's usually sold out so if you want this palette, snatch it up while you can!

Pros:
-three different trios of highlight/contour shades for different skin tones 
-large contour pans sizes
-sturdy packaging
-smooth buttery powders
-easy to blend
-very pigmented
-mirror included inside
-product placement guide included

Cons:
-limited availability (Sephora)
-small highlight pan sizes
-no replacement pans available
-pricier option than competing brands
-easy to make skin muddy if using too heavy of a hand
-matching brush sold separately ($36)
-bulky palette not ideal for travel
-no shimmer highlight shade available 

BH Cosmetics Forever Nude Sculpt and Glow Palette ($11.95)
This is an affordable option I threw in the mix because I actually really like this one. It's so cheap yet the product itself is amazing. This is a good option for beginners. 

Pros:
-price friendly
-two different options (Light/Medium and Medium/Deep
-blush shade included
-matte contour shades
-warm and cool shade included
-mirror included inside
-shimmer highlight included
-easy to blend powders

Cons:
-flimsier packaging
-powders can look too orange if too much applied
-online availability only
-can look powdery or chalky if not blended properly
-limited option for very fair/very deep skin tones
-blush is not too pigmented

I just ordered the new Lorac PRO Contour Palette, so when that arrives I'll update this post to include it. I hope you guys found this little guide helpful. Contouring can be a little daunting when you're just starting out and finding the right product can be tricky. Sometimes it just takes a little trial and error. If you own any of these, what are your thoughts? Which one is your favorite? Thanks for reading and have a fabulous day everyone!