Header

Header

Saturday, February 28, 2015

February Ipsy Glam Bag Review

Well now that it’s the end of the month, my Ipsy February Glam Bag finally arrived in the mail! Usually I receive my bags around the 13th or so, but for some reason this month it took forever! I’ve never had a problem with that before, though I have heard of a few people getting theirs a month or two late. Anywho…

The theme this month was #IpsyLOVE since Valentine’s Day is obviously the main attraction in February. The February bag is a super cute pink, white and grey triangle design and I LOVE it! It’s a sturdy material, almost like a mix between canvas and vinyl (if that is such a thing) and I really like the pink zipper. I can definitely find a use for this month’s bag instead of stashing it under my bathroom sink like all of the other bags I don’t really like. I received my bag about a week ago, so I've gotten a pretty good feel for all of the products.

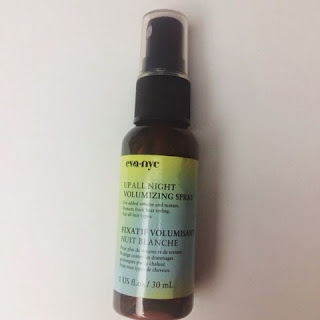
Moving on to the products, the first thing I pulled out was this Eva NYC Up All Night Volumizing Spray. I’ve tried hair masks and deep conditioners from this brand before, so I was pretty excited to try this out. It’s basically a texturizing spray. I tried it for a few days on my naturally wavy and generally unmanageable hair and I really liked the volume it gave me without getting frizzy or greasy like some sprays. This can also double as a heat protectant which is awesome since I never heat-style my hair without one and this is also perfect for travel.

The next thing is this ModelCo BLUSH Cheek Color. Ipsy subscribers would have received one of two colors, a soft rosy pink or an orange-peachy shade, and I received the peach in my bag. At first it looks bright orange and unwearable as a blush. Even when swatching it, it was pretty pigmented and kind of scary. But after I really blended it out, it gives the most beautiful golden peachy glow, it kind of reminds me of NARS Taj Mahal.

Next up is a skin care item. I mentioned in my last post that I usually get a decent mix of makeup and skin/hair care and this Hey Honey Take it Off! Exfoliating Honey Peel Off Mask is actually my favorite in the whole bag. This stuff is amazing! You apply it to your face, wait 15-20 minutes and gently peel it off and OMG… it left my face feeling so smooth and just this overall clean feeling. I felt that my face was brighter and more refreshed and the best part is that this peel off mask didn’t irritate my skin or leave it red.

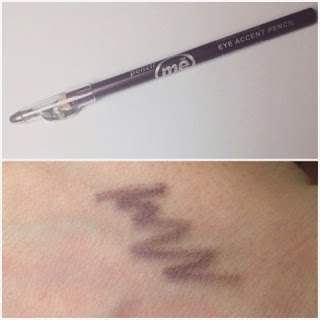
Sometimes Ipsy throws in makeup from brands I’ve never heard of so when I saw this Pencil Me In eyeliner pencil i was intrigued. I’m undecided on this one. I like the concept, since it’s a “green” formula and it’s all natural, but I was kind of disappointed on the color payoff. Looking at the outside packaging, I was imagining that it would be a nice deep purple, but the actual color leaves something to be desired. The wear was pretty nice though without a bunch of smudging off and the sharpener in the cap is handy, i just wish the color was more vibrant and opaque.

The last thing in this month’s Ipsy bag is a Cargo Cosmetics Mini Lip Gloss. Cargo is a brand that I’ve heard a ton about but I’ve never tried any of their products so I was pretty excited to try this. The formula is like any other lip gloss, slightly sticky but the color is pretty opaque. This particular color looks like Smashbox’s Be Legendary Lip Lacquer in Pout on application, it’s a pale white-based pink. It’s a pretty nice shade to layer on a light lipstick to add a bit of shine, but not anything too special.

Overall I feel kind of so-so about this month’s Glam Bag. There are a few good items that I really like and then a few not so much but I like that about Ipsy. They send a nice mix of stuff to try and I like that about this subscription service. And like I said in my last Ipsy bag review, if I’m disappointed with it, well hey, it was only $10.
What goodies did you receive in your February Glam Bag? Which ones were hits and misses for you? Let me know in the comments!
Xoxo
LivforLashes
Ipsy referral code:
http://www.ipsy.com/r/9gn1?sid=ipsypoints&cid=email


Follow me on Twitter! @LivforLashes


Find me on Instagram @livforlashes


Email: liv_2008@hotmail.com

Tuesday, February 24, 2015

Color Theory | Interpreting the Color Wheel for Makeup Application

Total first world problem here, but sometimes the most frustrating thing is trying to figure out which lipstick to pair with your eyeshadow, or which blush looks best with a certain lipstick. It sounds pretty stupid, but this is a pretty common issue we come across when applying makeup. A good tool to keep in mind when doing makeup is an understanding of the color wheel and how it works when pairing shades and tones. 


I was always big in to art and painting so I have a pretty decent understanding of colors and mixing them, but it never really came to mind to use the same concepts for my makeup until the past couple of years. Once I did though, I swear my makeup skills got better. I was more daring with color without the fear of looking like a clown. This post is all about color theory and how to understand the color wheel, and applying that knowledge to your makeup application. I've wanted to write about it for a while, since before I started my blog actually, but I wasn't sure how to word it. But after a long, long (slightly intoxicated) conversation about the color wheel with my sister during a paint night at a local bar, I knew I wanted to write it now. This post may be slighty boring, but I'm going to try to break it down so it isn't too confusing, so I hope you find this helpful!


Understanding Color
The first things to know about the color wheel, is to first understand colors. Hue is the most purest form of color. These are your primary (red, blue, yellow) and secondary (green, purple, orange) colors, and the colors you get when you mix them. Looking at your color wheel, they are the outermost colors on the wheel. So an example of this is red. There are tons of shades and tones of red, but the base for all of them is the hue of red. 
Shade is the hue, with black mixed in. So take red and add black, and you have a darker shade of red. Simple so far right? 
Tints are the lighter variation of a hue, by adding white. So white mixed with red gives you lighter tints of red.
Mixing grey with a hue is then called a tone. Tones aren't as dark as shades, but still a muted, dusty version of the hue.
 
So a little recap so far:
Hue- purest form of color
Shade- mix in black
Tint- mix in white
Tone- mix in grey 

The next thing to understand is complementary and contrasting colors. These are the colors at complete opposite sides of the wheel. They create a strong contrast with each other and make each other really pop. So an example of complementary colors are red and green. They are also good at sort of canceling each other out. Understanding complimentary colors will be especially helpful for concealing. You would use a green concealer to mute out a red color on your face, like an acne scar, or an orange/salmon concealer to hide dark purple/blue under eye circles. *quick tip: blending red and green cream products will give you brown, which you can then add yellow and white to make custom foundations. 

Analogous colors are those that are right next to each other on the wheel. So figure red, orange and yellow are close to each other on the wheel, they blend well together and look appealing in makeup looks. Think an ombré look: the colors are usually variant shades/tints of colors that are neighbors on a color wheel. 

Combining Colors
Now we all know there are a million combinations of colors to use for your makeup depending on what you like and the look you're going for. I don't like to call them rules but I definitely think that there are some guidelines to use for pairing colors in makeup to really make it complimentary and seamless. There are a few combinations that are especially ideal for makeup. 

The most basic color combination is a monochromatic combo. This is sometimes the most subtle or boring combination, but it's flattering on everyone and can easily be beautiful. Mono means one, so for a monochromatic look, you choose one hue, and use various shades, tints and tones of that hue. So maybe I wanted a monochromatic look using purple, I'd chose a variation of purple tones and shades for my entire look, like maybe dark violet lips paired with a softer purple, like lilac. 

Next is probably the easiest to do, if you want a little more color and spice to your look.  Remember when we talked about analogous colors? Well an analogous combination is the same concept of choosing colors next to each other on the wheel and creating a makeup look with them. It's flattering and they colors blend well without clashing. Say I chose blue, green, and yellow. These are next to one another on the wheel, so I don't have to worry about them clashing with each other or competing with one another. This is an especially pretty combination to use as a gradient for eyeshadow.

The third common color combo is a Triadic combination. Tri means three, so this is choosing three hues for your look. The thing about Triadic looks is you pick those three colors by looking at your color wheel, and imagining an equilateral triangle on the wheel. The three colors on the "points" of the color wheel are the colors you could use. For example, orange, yellow-green and blue would be a Triadic color combination. This look is more bright and packs a punch, but the colors still look well together. 

Now I again want to reiterate that these are by no means rules that you have to follow with your makeup, but it is helpful to remember the color wheel and how colors work with each other when doing makeup, especially if you are working on clients with different skin tones and hair/eye colors. Understanding color theory will help you get the most impactful and flattering makeup look. 

Well This was a long one, but I hope you found this post helpful! It can be confusing but you can google the color theory and find tons of other posts and tutorials to help you better understand it. It's a really awesome concept that not only works for makeup but something useful for everyday life like decorating and choosing an outfit. And it really does help on those days when you have a killer makeup look but don't know what lipstick or blush to wear :)

Until next time guys...

xoxo
LivforLashes

Follow me on Twitter! @LivforLashes

Find me on Instagram @livforlashes

Email: liv_2008@icloud.com

Monday, February 23, 2015

Where the Heck Have I Been?!

Hey Everyone! Seriously, long time no see! It has been about a week and a half since I've posted anything and I feel sooo bad! I caught the flu so the last 9 days consisted of an IV, lots of sleeping and meds and a Grey's Anatomy Netflix marathon. I was seriously so drained and felt so terrible I couldn't even look at my phone, let alone a computer to type anything up, at least anything of a decent quality, for you guys, but I'm happy to say that I am back up and running and ready to get back into the swing of things!
 
I have a few posts coming up soon including a few swatch/reviews, a some how-to type tutorials and whatnot, but I want some input from you, my wonderful readers! What kinds of posts would you like to see? Do you enjoy more make up tutorial style things? Reviews? I was also thinking about doing a weekly chat post, just to catch up and let you guys know what's going on, or maybe just chat about whats new for trends, or something more wellness/lifestyle oriented. Or maybe some fitness/health posts?
I have so many ideas floating around in my head, but I don't want to bombard you but with a bunch of random things that you may not be interested in, or pointless posts with no substance.
Please let me know your thoughts in the comments, I love hearing what you think!
 
xoxo
LivforLashes

Saturday, February 14, 2015

No-Tools Valentine's Day Mani | 3 Easy Manicures for Valentine's Day

Happy Valentine's Day guys! Have you ever had a big date and gotten every little detail planned for a perfect night, only to realize last minute you didn't get your nails done? Don't fret! I have three super easy manicures for V-Day, whether you had just forgotten about your nails for your big date, or you're just a last minute person like I am. Each one is super simple and literally takes just a few moments and the best part? No tools! No complex designs! Literally any one with any type of nail painting skill level (if that's such a thing) can do these. The only "tools" you need are your polishes (obviously), a bobby pin, and a cosmetic sponge. Keep reading to see how to create these cute nails!
 
 
1. Dot Manicure
For this first one you need several polishes. I used white, light pink, dark pink and red. You will need a bobby pin for this one. 
Start off with clean nails, painted with just a clear base coat. With your bobby pin, dip it in the white polish and start dotting the polish on to your nail. It doesn't have to be precise and there's no pattern here we're aiming for. 
 
Repeat this with the other three nail polish colors, filling in the blank areas with different colors as you go. 
 
Seal with a top coat and you're done! I concentrated my dots more towards the tip of the nail, but you can do the whole nail, or just an accent nail like this if you want. 
 

2. Ombré Accent Manicure
For this one you need the same polishes as the first manicure and a disposable cosmetic sponge. Start by painting a nail or two with the white polish. This is our base for the ombré. I painted the other nails the same colors I am using for my ombré. 
 
Now paint stripes of polish, going from dark to light on to the cosmetic sponge. 
 
Dab the sponge on to the white base, allowing a few seconds between coats for the polish to set some. If you do it while it's too wet, the colors get mixed and messy. 
 
Clean up the edges with a q-tip dipped in remover and add a top coat to finish off this mani. 
 

3. Gold and Red Heart Manicure
For the third manicure I wanted something a little more sultry and not so bright as pink, so I went for gold and red. Paint one or two nails gold and the rest red. 

 
For the gold nail(s), grab your trusty bobby pin and dip it into some red polish.
Dab two dots of polish on to the upper corner of the nail. This will be the top of our heart.
 
With a little more red polish, connect the dots to finish the heart. 
 
Add a couple of red dots by the point of the heart. 
 
On the red nails, I wanted something so they weren't so basic, so I pulled out some nail studs. You can get these anywhere for just a few bucks. I put a tiny dot of clear polish near the cuticle and then placed a gold circle stud right on the polish. 
 
Again, seal everything with a coat or two of clear polish and you're done!

See? Super simple and each one literally took me about five minutes (not counting drying time between coats). These are perfect for a last minute mani and so cute too!

I hope you guys liked this post! Which one was your favorite?

xoxo
LivforLashes

Polishes Used:
China Glaze Clear Base/Top Coat

Follow me on Twitter! @LivforLashes

Find me on Instagram @livforlashes


Wednesday, February 11, 2015

Nubounsom Mink Lashes | SALE!

Hey everyone! I just wanted to drop in and tell you guys about a HUGE Valentine's Day sale that Nubounsom is having! As you have probably already heard, Nubounsom is my ALL TIME favorite lash brand. They have a ton of really awesome styles of both mink and faux mink lashes and right now through Sunday (February 15th) at midnight PST, you can take 60% percent off of your order on mink lashes! 60%!! That's seriously an amazing deal on mink lashes. It evens out to about the same price you'd pay for a pair of HOL faux lashes. Just swing by the website and use the code "nubounsom" at checkout. 

xoxo
LivforLashes

Nubounsom: http://bit.ly/1DqG8KB

Colourpop Lippie Stick | Review + Swatch

Hello again everyone! As promised, here is my second part of my Colourpop Cosmetics review. In my last post (you can check that out here), I went over the Super Shock eye shadows that I purchased. I also purchased eight shades of their Lippie Stix and that's what I am going to swatch for you guys now.

I've quickly fallen in love with these. They're convenient, good quality and just like the shadows, they are super affordable at $5 each. I've done the cap test in my purse too and the caps don't fall off at all! (huge pet peeve of mine)

Each shade has an accompanying lip liner available to buy (I didn't purchase the liners...yet), which is pretty cool. It takes the guess work out of choosing a complimentary lip liner. The finishes on these are amazing as well. The mattes are the perfect matte without being drying and the satin shades don't slip around and feather like a lot of other satin lip sticks. The scent of these is a little bit of a turn off for me though. They smell sweet at first, like a lot of lipsticks, but the longer I had it on my lips, the more aware I was of a slight waxy-chemical-y smell.

The lipsticks look almost like a pen, about the same size of one. They come in a plastic stick with a white cap, with the product being accessible by twisting the top. On the bottom of each tube is the name of the lipstick with a shade indicator which is pretty handy. The lipstick itself is a smaller diameter than most lipsticks, and with a chisel-tip, making application super easy and pretty foolproof.

Like I said before, I purchased eight shades in total (for now!) so let's jump into some swatches!
*All swatches are one swipe, no liner, no concealer for clean up*
Bound

The first shade that I was drawn to was Bound. This is a neutral almost baby pink. It isn't too bright and its such a soft shade. This one is a glossy finish, but it isn't slippery or too sticky. It almost feels like a lip gloss. This is definitely one of my favorites. Such a good staple pink to have.


Brills

Now y'all know I love me some lavender lipsticks so when I saw Brills I didn't hesitate to add it to my cart. Its just too pretty. Its a light lavender with pinky undertones and this one is a soft satin finish. It isn't too bright so that makes it pretty wearable for any occasion.


Cake

Cake is a fun punchy orange shade. It's perfect for spring and summer and it's a satin finish, so it has a hint of gloss. It did get a little patchy after I started talking but no big deal, I just used my finger to blend it out a bit and it looked fine. This is a good dupe for Melt Cosmetics' Summer! lipstick.


Ellarie

This one was a collaboration shade with @Ellarie form Instagram and Colourpop and I was slightly disappointed with it. It looks like such a pretty matte burgundy in the tube but applies a little patchy. It took a good three or four swipes to get full color payoff and then at that point it didn't fell matte, just thick and uncomfortable. I've been using it as more of a stain.


Fancy

Fancy is a more toned down version of Cake to me. Its a slightly less orange shade, more peachy,  and it looks as if it almost has a slight sheen to it. This is a satin shade so the slight shimmer in it just looks gorgeous. Again, this one is perfect for spring.


Frenchie

This one is a beautiful true red with blue undertones. Its a matte which is a huge plus for me, since glossy/satin red lipsticks can sometimes be impossible to apply without getting it all over the place for me. It does have a slight creamy sheen to it though, so I wouldn't say its a true matte. This another staple shade that I think every one should at least try.


Frida

Frida is another collaboration shade, this one with Coffee Break With Dani from YouTube. OMG guys. This one is beautiful! Its a beige-y pink and its literally the most flattering pinky nude that I think I may own. Its a satin finish, but feels more glossy, but again, this one isn't slippery and it felt really smooth on the lips. I actually already purchased a back up of this one since its become one of my most used lippies these last few weeks.


Skimpy
Last one in my order is Skimpy. Something about this one really caught my eye and I just love it. It's a beige with very slight orange undertones to it and although I thought it would totally wash me out, the glossy finish makes my lips look full and juicy. This is definitely one of my favorite true nudes in my collection. the only downside is that this one did feel a little sticky, but with a dab of translucent powder, this one was perfect.

I ordered these around Christmas when Colourpop were having daily deals, and the deal when I ordered was a free Lippie Stix primer with a purchase of I think $25. The primer is meant to enhance the wear of the lipsticks. its supposed to help fill in lines on the lips and smooth and plump your lips as well. It contains mango, avocado, Shea butter and Vitamin E so its good on its own as a balm too. I didn't notice a huge difference with/without primer with these, but this still feels really nice on the lips and I really like it.

That does it for this review! I'm already planning another order because these are just amazing for the price. For $5 the quality is amazing, pigmentation is spot one and there is a HUGE shade selection. I NEED them all haha
What shades have you picked up, or which ones are on your wish list? I would love to hear your thoughts on these!

xoxo
LivforLashes

Sign up for the Colourpop newsletter on their website and get a $5 off coupon code!

Follow me on Twitter! @LivforLashes

Find me on Instagram @livforlashes